Caring for Your Road/Hybrid/Cruiser Bike

Commuters, roadies, and pleasure cruisers … We know you LOVE your bike. Your bike makes you feel like a hero! You know the feeling: the air is crisp, and you feel the energy of each pedal stroke diffuse deep into your bones ... you're flying high, Superman cape streaming behind you.
And you ARE a hero. You take time to make time for your healthy lifestyle. To those who seek a strong life balance, you are the example. When you get on your bike you feast on fresh air, finding focus and inspiration — all of which give you the energy to be the best that you can be.
To support you in being the conscientious hero you are, we’d like to offer some tips on maintaining the health of your steed.
Pre-Ride Maintenance and Safety Screening
When we suggest checking over your bike before a ride, we don’t mean ten minutes before you are heading for the trail head. Schedule some time when you won’t be rushed, and also have an opportunity to get something fixed if necessary.
Check Your Handlebars
Place hands on grips, press down with weight, and try to rotate them back and forth. If your handle bars have any movement make sure to tighten. This can be done very quickly at home with a 3-way hex wrench, usually 4 or 5 mm.
Long-term maintenance tip: Every year, lube the screws that connect the handle bars to headset with a squeeze of Park Tool grease + a Q-tip.

Retightening the stem clamp bolts with a Park Tool 3-way hex wrench.
Check the Stem Tightness
This is the gap area where the headset meets the frame. To check, hold the front brake and rock the bike back and forth. If you feel any movement or play, first loosen the stem clamp bolts and tighten the screw at the top of the stem to a quarter turn more than finger tight. Then, straighten the handlebars and retighten stem clamp bolts.
Check the Bearings
These include: headset (feel for roughness, or vibration); front wheel (hold fork and spin front wheel; should spin nice and freely, no roughness); pedals (should spin freely, no noise); bottom bracket; rear wheel. If this sounds like Greek to you, come by and we’ll demonstrate.
Check Your Brakes
Check the brake caliper bolts; make sure they are tight. Check pads for wear; make sure the pads are present and aligned, each pad an equal distance from the rim or rotor. Ideally, the wear on your pads should be equal, if this is not the case it may indicate an alignment issue.
Your brake levers should have enough tension to pull to about one inch from the handle bars. If your pads are worn and/or your levers are loose, we can help you get them adjusted properly.

Your brake levers should have enough tension to pull to about one inch from the handle bars.

This is an example of a toe-in brake. We do this sometimes when the brakes get really squeaky.
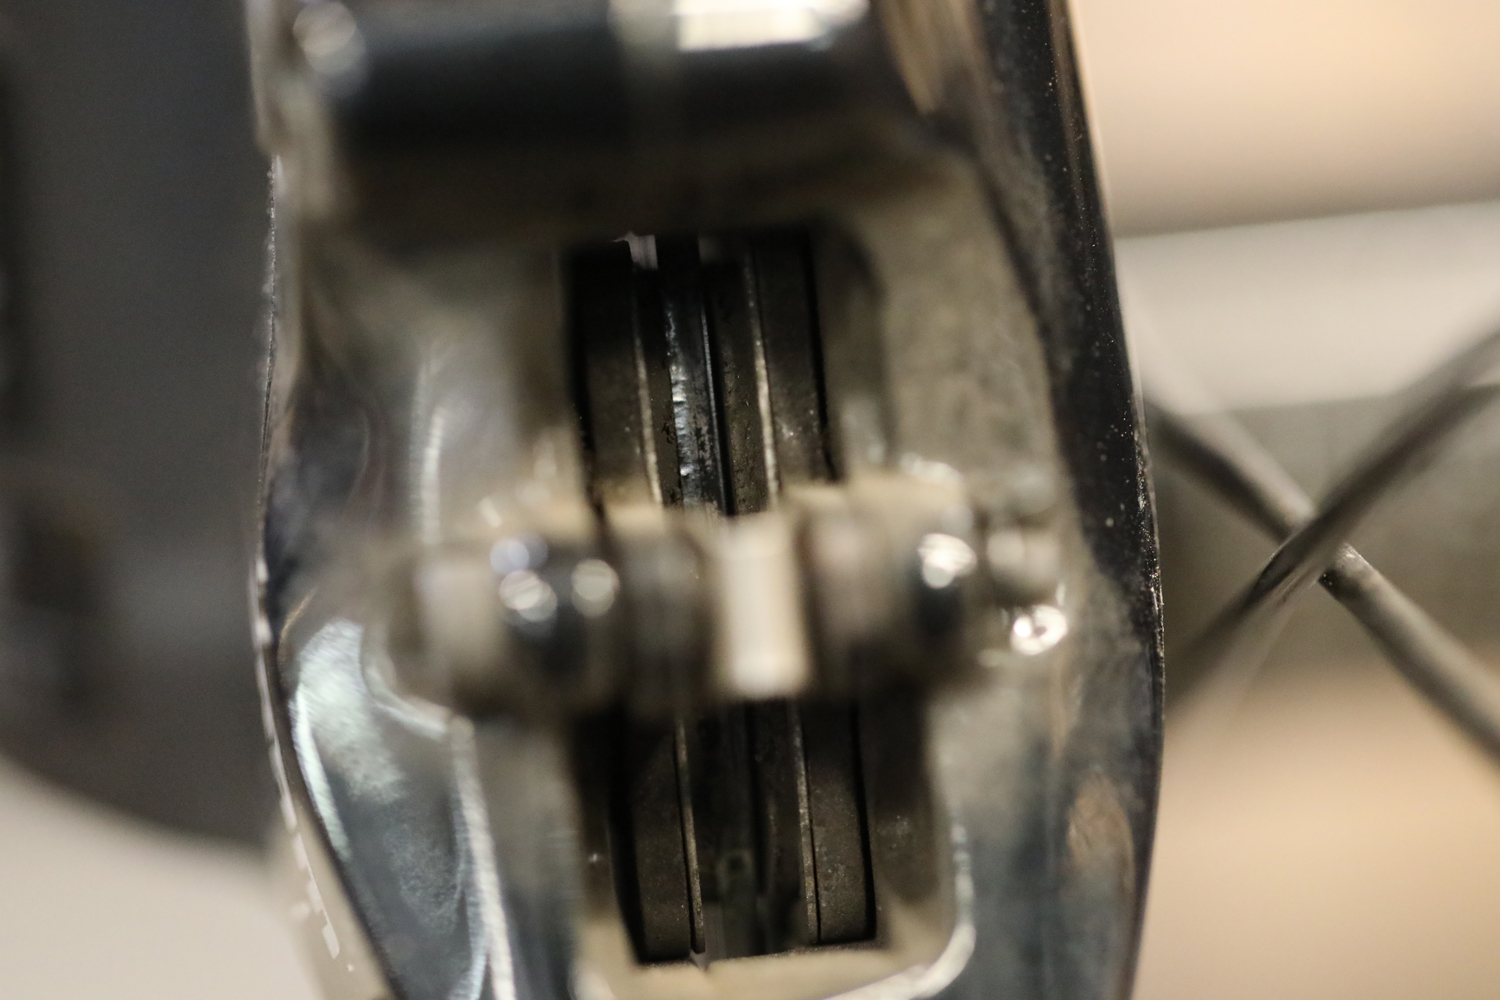
Disc brakes: Ideally, the wear on your pads should be equal. Notice how, in this case, the left side is more worn than the right. This may indicate an alignment issue.
Check Your Tires
Make sure your tire pressure meets the minimum psi; this info can be found on your tire. There’s a fine art to running different amounts of tire pressure depending on terrain. We will cover this in details in another post (plus other helpful tire tips!), but in general, you want to run the psi indicated on the tire to avoid pinch flats and other issues.
Be sure look at the tire tread. If tread is visibly bare in center of tire, it’s time to swap it out for a new one. Pop on over and our knowledgeable crew can set you up.

For this road tire, the acceptable pressure range is 80-110 psi. It’s helpful to have a pump with a dial at home.
Check Your Wheels
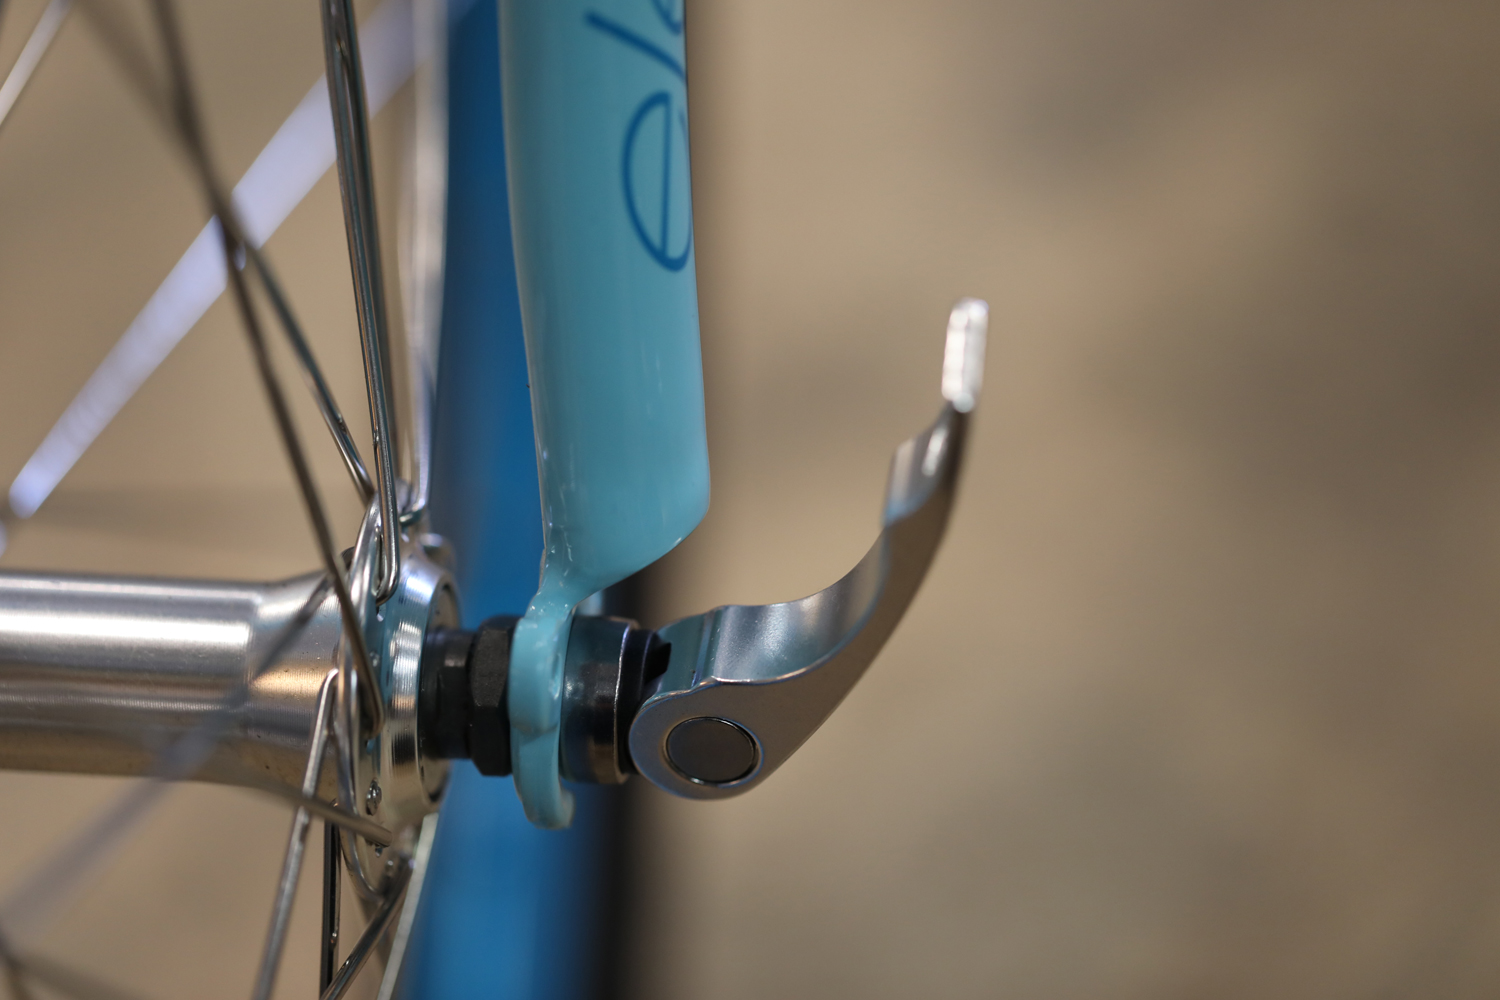
Prior to hopping on your two-wheel vehicle always, always make sure your front AND rear skewers are secure and tight. It’s good practice to set levers to between the 12 and 3 o’clock positions so they cannot be opened while riding.
Also, check to make sure the wheel spins straight. If not, come see us before you hit the trail. If you don’t notice a wobble at this checkpoint, but do on your ride (wobbly climb or squirrelly descent), you know it’s hot time to get that rear/front wheel trued.

Always, ALWAYS make sure your front and rear skewers are secure and tight. Like THIS.
NOT this.
Check Your Seat and Seat Stay
Make sure the seat is properly aligned (by getting on bike or eyeballing), and routinely check to make sure nuts and bolts connecting your seat to the seat post are tight and secure. If you move the seat back and forth and there is any play, you will need to tighten the connecting screws.
Also check the seat stay (the ring that holds the post in place). Use a 3-way hex wrench (usually 4 or 5mm) to tighten clamp if needed.
Lube Your Chain
Lube your chain at least once per week, and definitely at end of your ride if the bike gets wet or mucky. To effectively lube your chain, first be sure to clean it before applying the chain lube. You can use a chain cleaner such as ParkTool’s CB-4 Bio ChainBrite, or at the very least wipe the chain down with a rag.
To apply the lube, backpedal while applying a thin stream to one revolution of chain. If you have a quick release chain link use that as a point of reference to ensure you cover the entire chain. If you do not have a quick release, back pedal three to four full rotations to ensure that full coverage.
Before wiping the chain, ride around block, or back pedal for 30 seconds to a minute. Then, use towels to clean dirt/muck from the cassette on rear derailleur. And using a towel, put the chain between your left index finger and thumb (use the bottom chain, moving from cassette to front ring), and use same rotation pattern described above.
Too confusing? Feel free to ask our service department for a quick tutorial!
Pro tip: We use Dumonde Tech because it lasts the longest and is best in class for protection of your chain.

To apply chain lube, backpedal while applying a thin stream to one revolution of chain.
Check Your Suspension (for Non-Rigid Frames)
Some cross bikes and hybrid commuters boast front suspension. It’s important to take good care of that fork as they can be expensive to replace.
Carefully look over your fork to make sure it’s clean and smooth. Be sure to inspect your stanchions for scratches as this sort of damage can carry dirt to the inside of the fork. (Stanchion scratches are a 911 — bring your fork in right away to be fixed!)
Grit, grime, or any other build up around your seals means they are overdue for service. Proper post-ride care and regular service will keep your suspension feeling like new.
FOX recommends a complete overhaul of the fork every 125 riding hours, or yearly, whichever comes first.
RockShox service recommendations are a little more complicated, as they are model-specific. Basically, they recommend that the fork lowers be serviced every 50 riding hours, and a complete overhaul be done between 100-200 hours depending on the model of your fork.
Therefore, you would bring your fork in for “basic” service at least once between 100-hour overhauls, and three times between 200-hour overhauls.
If you ride aggressively, and in particularly dusty or dirty conditions (cyclocrossers, we’re talkin’ to you!), you’ll obviously want to service your fork more frequently. Keep in mind that following a recommended fork maintenance schedule will keep your fork running smoothly for much, much longer than if you don’t.
Learn more about suspension in our Guide to Caring for Your Mountain Bike Suspension.
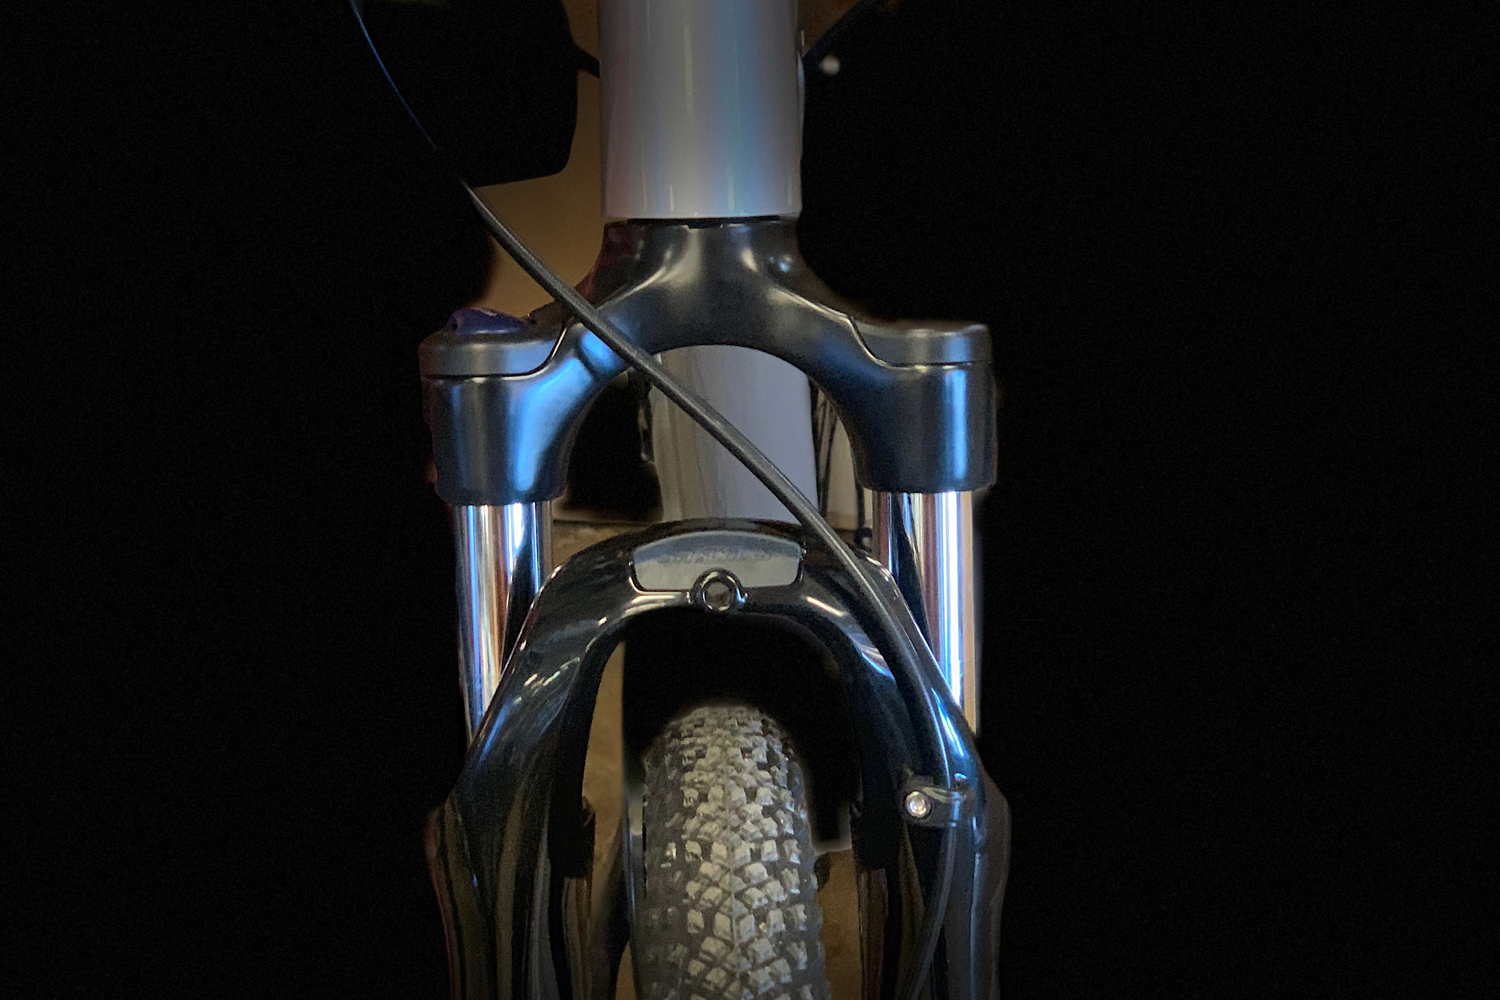
A healthy, happy looking front fork.
Post-Ride Maintenance Routine
After your awesome date with your bike, you’ll want to give it some love as well. This might be a great time to run through the checkpoints outlined in the Pre-Ride Maintenance Routine so you are all set for your next ride, instead of scrambling at the last minute because your week got too busy.
And if your steed got dirty, here are some pointers for sprucing it up:
Rinse
Use a hose to give it a rinse. Yes, a hose. You may have been cautioned against using a hose to wash your bike, but it’s important to know that spraying water on your bike will not cause damage. It’s HIGH PRESSURE that causes damage and can push out grease from bearings.
To avoid this, use a low to medium stream setting and take care not to directly spray the hubs, the bottom bracket, or anywhere with bearings. With this in mind, if you don’t have access to a hose, a water bottle will suffice.
If your bike is equipped with front suspension, be sure to clean it after each and every ride. Use mild soapy water, rinse with a very light pressure water spray (taking care not to spray water directly at the seal/upper tube junction), and wipe dry with a clean soft cloth.
Do NOT use any solvents or degreasers on your fork or shock as these can damage exterior finish and anodized parts. If you don’t have access to water, at the very least wipe off the dust wipers and seals after your ride.
If your steed needs a more thorough cleansing after an especially dirty ride, use a bucket of warm water and these supplies:
Brushes (we recommend the Park Tool BCB-4.2 bike cleaning brush set which includes a gear brush, a bottle brush, a combo bristle and sponge brush, and a frame cleaning sponge)
Solvent for the chain (you can’t go wrong with Finish Line Speed or Citrus degreasers)
Soap (Finish Line makes a great surfactant called Super Bike Wash)
Lube for pivots and derailleurs (Dumonde Tech is our favorite)
Dry
Dry your bike off well with a soft, clean towel. An old beach or hand towel works great.
Lube the Chain
See instructions on how to do this in the “Lube Your Chain” section above.

Epicenter mechanics are experienced, knowledgeable and friendly! Stop by or call with any questions and we’re happy to help.
Other Necessary Maintenance
Along the way, you’ll want to maintain other aspects of your bike. This section may be a bit more information than you want to assimilate. But don’t worry, that’s why you have us. We’re happy to do the wrenchin’ so you can get out and play!
Whether you do it yourself, or put your trusted steed into our capable hands, we can’t emphasize enough the importance of regular maintenance. Worn-out parts degrade other parts, and that means unnecessary, expensive repairs. Regular maintenance will keep your machine running STRONG and smooth.
Drive Train
This is your bike’s “motor.” A worn drive chain does not feel good to ride! There are several components to look after in your drive train: the chain, the front chain ring, the cassette, and the front and rear derailleurs.
Chain: In addition to lubing your chain weekly, every few months you should check the wear on your chain. There is a special tool for this practice. Even with the most loving use, your chain will loosen over time (typically every 1,000 – 1,500 miles). This will cause increased wear on your cassette and chain ring, which may result in an expensive fix. Proper chain maintenance will extend the life of your front chain ring(s) and rear cassette.
Front chain ring: Keep an eye on your front chain ring. If the teeth start to look like little shark teeth (hooked), you should seriously consider replacing the component.
Cassette: This component will need replacement if the chain is skipping when you know you have a healthy chain.
Derailleurs: Ideal maintenance includes wiping dirt and grime from your rear derailleur after each use. If riding in dry conditions, wipe the pulley wheels with a rag and use a brush to clear dirt in between cassette rings every other use or so. For the front derailleur, you can use a brush to wipe debris from the chain ring and the space between ring and derailleur.
Pivots, Cables & Housing, Bearings, and Brakes
Lastly, here are a few other very important maintenance recommendations from our mechanics. Remember, the more preventative care you invest in, the less likely you’ll wind up with a major repair bill down the line.
Pivot service every 300 hours
Cables and housing every 300 hours, for optimal performance
Bearings (headset, bottom bracket, and hubs) service every 300 hours
Brake bleed service every 1,000 to 1,500 miles
The above maintenance is incorporated into tune-up and overhaul packages we offer by our professional mechanics. Stop by to chat with our crew to determine the best service regimen for your bike.

Be Your Bike’s Hero
You want your bike to last as long as possible, and the more regularly it is cared for, the better it will perform, and longer it will live.
We are happy to guide you on DIY procedures, and on scheduling service. Whether you want to do the service yourself, or bring your bike into the shop, be sure to add regular bike care to your routine. If you purchased your bike at Epicenter, remember you get unlimited FREE basic tune-ups for the life of your bike. Give us a call to schedule an appointment.
Your bike makes you feel like a hero — be a hero for your bike. The better you take care of your trusted steed, the better it will take care of you!